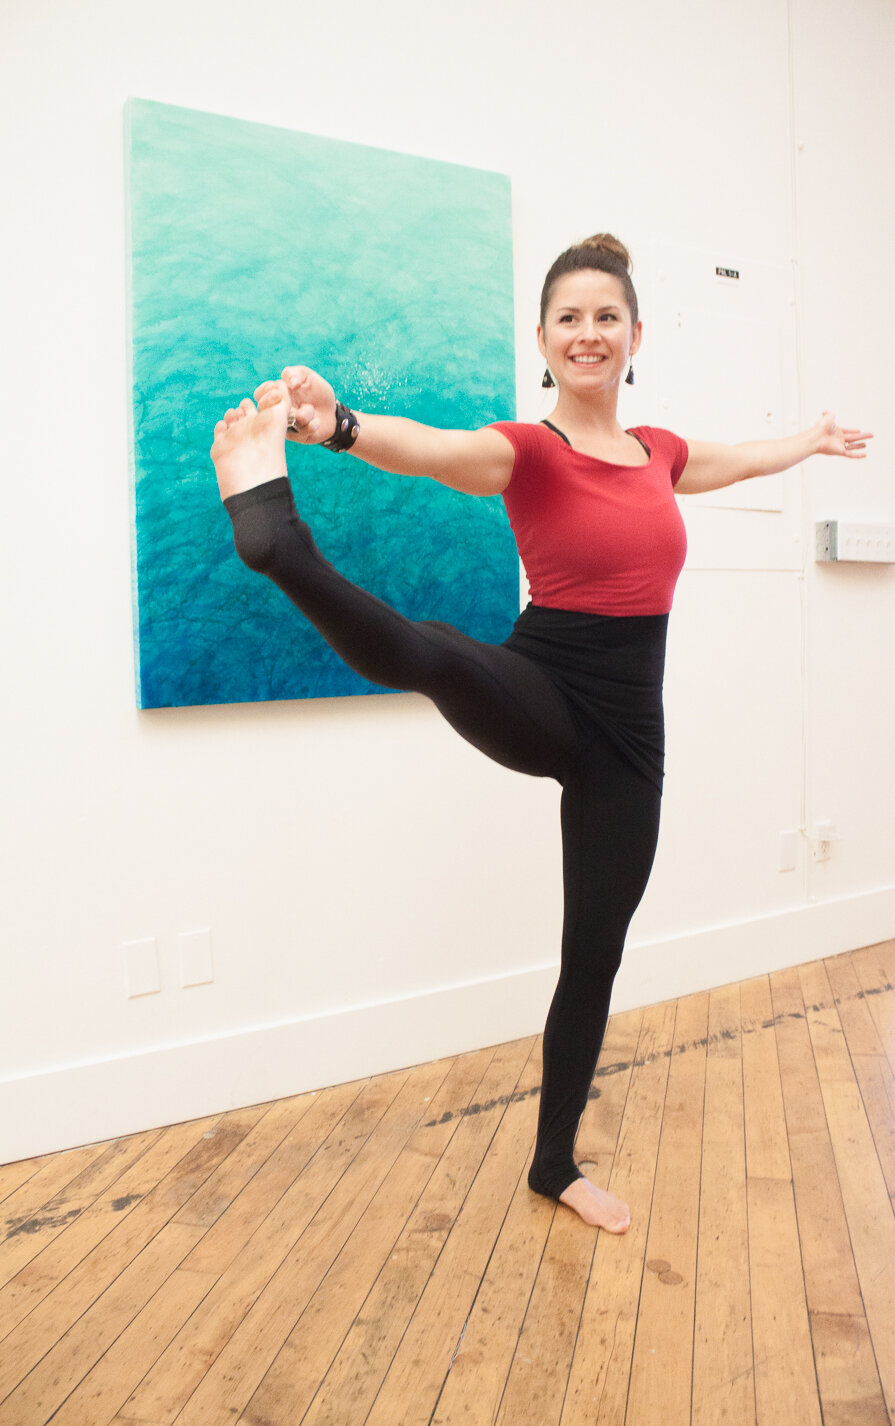
Standing Hand to Big Toe Pose / Utthita Hasta Padangusthasana
Learn Standing Hand to Big Toe Pose for Vata Season
Last month I promised to write about a posture that we had been conditioning for and working towards at the time: Standing Hand to Big Toe Pose / Utthitha Hasta Padangusthasana. So here we go!
In yoga there are many balancing postures where we’re standing on one leg with the other lifted in a variety of positions. And, off the mat, we’re in a one-legged balance posture for a moment in time every step we take. Having good balance is an important part of our health, and one that becomes even more so as the years go by. In balance poses, we root down into earth for stability, and this provides a rebound action that helps us lift up toward sky. These opposite and complementary actions allow for steadiness and expansion, two of my favorite principles of Hatha yoga.
Last month I wrote to you about vata season, and how to adapt your yoga practice to support the energies and effects of the elements that are dominant in fall through mid-winter (air / vayu and space / akasha). If you didn’t have a chance to read that article, you can here. When I began to contemplate a posture that would be good medicine for this time of year, the first pose that came to mind was Standing Hand to Big Toe Pose / Utthitha Hasta Padangusthasana. So, I decided that we would focus on this pose in my public classes for the first month of vata season. The immediacy of this thought was surprising because this is a posture that’s really difficult for me. Regardless, I worked on the pose, concurrently, in my own practice, and you know what? … It became more accessible and even enjoyable – who knew?! In fact, many of you who participated in this series reported the same. Smart sequencing, conditioning, and consistency WORKS!
In this article, I’m going to share some alignment ideas and set up this pose. Firstly, I don’t believe in universal alignment. There are lots of dogmatic alignment teachings in the yoga world that aren’t rooted in anatomy and biomechanics, some of which I subscribed to as a younger teacher (I'm planning on sharing those in a future article). Over the years I’ve shed layers and layers of ingrained alignment principles through exploration in my own practice and work with a large body of students. Let’s begin with alignment explorations, and then I’ll share some ways to prop this posture.
BUILD YOUR FOUNDATION
I'm going to describe this posture with the left leg as the standing leg, and the right leg lifted. Begin by pointing your left toes straight forward, then root down through the center of your left heel, the ball mound of your big toe and your pinky toe. Lift your toes and spread them, then place them back down, wider than they were before. Without scrunching your toes, draw the base of your toes to your heel, to lift the arches of your foot. This action can help to invite an upward flow of prana, prana vayu, which promotes a sense of lightness and expansion in the body. At the same time, stay rooted through those 3 points on the sole of your foot and lengthen out your exhalation to encourage a downward flow of prana, apana vayu. The exhalation will help to ground you into earth, and to promote a sense of stability in your body. With your weight shifted into your left foot, lift your right foot up and hover it above the ground. Assess your balance here. Then, replace your right foot and turn your left toes and knee to the left one or two degrees, laterally, and re-try the balance. Some may be more stable with the standing leg toes pointing straight forward and others with the toes and knee pointed out to the side just a tiny bit, depending on where your acetabulum are located on your pelvis.
ACTIVATE YOUR CORE AND ALIGN YOUR SPINE
When we think of core muscles, we often jump right to the abdominals. However, the foundation of our core strength lies in our pelvic floor muscles. One way we can activate and lift the pelvic floor is by engaging the inner thighs, the hip adductors. We can do this in some poses by squeezing a block between the legs, or squeezing the legs together. With a posture in which the legs are moving away from one another, like Utthitha Hasta Padangusthasana, we can isometrically adduct the hips by drawing the inner thighs together, without actually moving them, or, even while moving them away from one another. When we complete the exhalation to its fullest, the pelvic floor naturally lifts. With practice we can learn to keep the pelvic floor toned and lifted during the inhalation as well. The engagement of the pelvic floor helps activate another important core muscle, the corset muscle, or Transverse Abdominis.
When we lift a leg, flexing the hip, we may experience limited range of motion due to tight hamstrings. If we keep the knee straight as we lift the leg, and the hamstring isn’t able to lengthen enough, the pelvis will tuck under (posteriorly tilt) and we’ll end up rounding through the low back. We’re aiming for a neutral pelvic tilt and spinal curvature in Utthitha Hasta Padangusthasana, so it’s best to keep the lifted knee as bent as needed to allow for a slightly forward pelvic tilt.
Often the lifted leg side of the pelvis will want to hike-up toward the shoulder. To level your pelvis laterally, engage the left side, low back (Quadratus Lumborum) and side waist, lifting the left side of the pelvis up. At the same time draw the right outer hip down and hug it in toward the left side. We want to lift the left side of the pelvis up and create space in the hip joint, rather than pushing it out to the left side and compressing the joint.
Press down through the three points on the sole of your left foot and allow the lift of your arches to encourage a line of prana up your inner leg, lifting your pelvic floor, toning your Transverse Abdominis, lengthening your spine and finally reaching up through the crown of your head. Explore the actions here of simultaneously rooting down while lifting up.
PROP CITY
I love props. I used to not love them, thinking that they were for those who couldn’t do the pose the right way. Ahhh… youth. Now I see them as fabulous additions to enhance the experience of yoga. The support that props offer allows for a deeper connection to one’s breath, mind, and heart, and creates the space to fully immerse ourselves in the moment. When we’re connected to all of those layers within ourselves, we can more fully connect to the greater consciousness and interconnectedness of all things. This is yoga.
Here are some ideas for how to modify and prop up this posture:
Do this posture reclined first, so you can get feedback from the floor about how your pelvis and spine are articulating.
Use a tennis ball or another type of ball to massage the soles of your feet. This can help to awaken sensation and energize. Having a better sense of how your feet are rooting into your mat or the floor, and the lifting of the arches of your feet, can assist in greater awareness and balance.
Start with your lifted leg knee bent at 90 degrees. With a shorter lever you should have more stability and can explore these alignment ideas more easily.
Use a wall! Stand next to a wall with your standing leg side an arms distance away and place your hand on the wall. You can also stand in front of a wall, so that your lifted leg foot presses against the wall. And, just like the floor, you can stand with your backside against the wall so that the back of your pelvis, ribcage and skull are pressed against the wall (not heels nor your low back).
Use a strap, with or without a wall. Make a small loop with your strap to place over the ball of your lifted leg foot, or use a strap with no loop. You can try using the strap with your foot pressed against the wall, then, once you feel steady, try removing your foot from the wall. You’ll have the wall there as you need to regain your balance.
YOUR INNER TERRAIN
I want to emphasize that the alignment suggestions I’ve offered are just that… suggestions. Our pelvic bowls are all shaped differently, with varying locations and depths of the hip sockets (acetabulum), and different sizes and angles of the head and neck of the thigh bones (femurs). This equates to different ranges of motion in the hip joint, and different outward presentations of the body. I encourage you to use the barometers of the quality of your breath, and the tone of your mind to determine if a suggestion is useful for you. If you move into chest breathing or your breath shows signs of strain, or if an attitude of aggressiveness arises, you may benefit from a slight shift in the position of your body, or by utilizing props. Focus more on your inner terrain, rather than what the shape looks like from the outside. What’s the felt sense of your energy body (pranamaya kosa)? How is prana moving and expressing? The breath, mind state, and the flow of prana are the most important parts of the posture. Listen, reflect, and adjust so that you feel both steady and expansive.

ACTIVATE AND ALIGN
The foundation of our core strength lies in our pelvic floor muscles. One way we can activate and lift the pelvic floor is by engaging the inner thighs, the hip adductors.
When we complete the exhalation to its fullest, the pelvic floor naturally lifts. With practice we can learn to keep the pelvic floor toned and lifted during the inhalation as well. The engagement of the pelvic floor helps activate another important core muscle, the corset muscle, or Transverse Abdominis.
LEG ROTATION
Some may be more stable with the standing leg toes pointing straight forward and others with the toes and knee pointed out to the side just a tiny bit, depending on where your acetabulum are located on your pelvis.
THE FOUNDATION
Root down through the center of your left heel, the ball mound of your big toe and your pinky toe.
Lift your toes and spread them, then place them back down, wider than they were before.
Without scrunching your toes, draw the base of your toes to your heel, to lift the arches of your foot.
Root Into Your Life
Happy Fall!
Last week I began teaching a new series in my classes, which we'll explore over the next 4-6 weeks. Some of you aren't able to partake in my public classes, so I thought I'd share what we're working on here, in case you'd like to incorporate it into your own practice. For those of you who are able to join class, this will be a refresher and will hopefully provide more information and support for your home practice.
You all know how I love weaving the wisdom of Ayurveda into my teaching. Part of this series is rooted in exploring the Ayurvedic constitutional type, or dosha, called vata, and how we can adapt our practice to align with the current, vata season. Another part of this series is focused on a peak pose that I feel both balances and celebrates the vata dosha – Standing Hand to Big Toe pose / Utthita Hasta Padangusthasana. This article will explore the vata dosha and practice recommendations, and next month I'll include some key conditioning and alignment principles for Standing Hand to Big Toe pose.
Vata is one of the three Ayurvedic doshas, with pitta and kapha making up the other two. We all have a unique mix of the three doshas. Our dosha is like our blueprint, and is thought to be determined at conception. While our original blueprint doesn't change, lots of factors influence our dosha balance, including diet and lifestyle, our age, the time of day, and the time of year.
The vata dosha is dominant from fall through mid-winter (so here we are!). Vata is made of the elements air (vayu) and ether (akasha), the two lightest elements of the five. This lightness creates the expansive quality of the vata dosha. Those who have a lot of vata in their constitution are quick thinking, with boundless inspiration and creativity. Vata is associated with the energy of motion, which includes moving our physical body, the circulation of blood, lymph and other fluids, as well as movement in the realm of nerve impulses. Whether there's a lot of vata in your dosha, or just a little bit, we all have the tendency to go out of balance in vata excess ways more easily during this time of year.
When there’s too much motion, we can find ourselves distracted, ungrounded and moving too fast… disconnected from our body and earth. There may be anxiety, insomnia, forgetfulness and poor memory. With too much movement we can experience rapid heartbeat and respiration, twitches and tremors. The main symptom of excess vata is pain. Slowing down our yoga practice, and incorporating tools that promote the downward flow of prana (apana vayu), rooting us into our bodies and into earth, can help calm and nourish the vata dosha.
Here are some simple tools to support vata:
Slow and lengthen the exhalation part of the breath cycle.
Practice L nostril breath and Chandra Bhedana.
Take a lowered gaze point (dristhi).
“Going to the Bones” mindfulness tool: feel the bones of your body and where they’re connected with your mat, your props, the wall or the floor. Sense the steadiness of floor, and the quietude of earth. Sense that same steadiness in you.
In asana practice incorporate more forward folds, standing balance postures with an emphasis on rooting down into earth, as well as restorative and yin yoga.
During the colder portions of the year, it’s helpful to create heat in our practice, and in vata season, heat coupled with grounding, so as to not overstimulate the nervous system.
Vata season reminds us to slow down, root into earth, and turn our attention inward, just as the plants and animals are doing all around us. Nature provides us with such wise guidance, when we pay attention. Happy practicing, Friends.